
Note from Brian Holcombe: This post continues a series on makers who’ve taken up a unique devotion to their trades. I meet and interact with many people in my travels and through my online conversations. In doing so I’m introduced to the incredible efforts these folks have put forth. I want to take this opportunity to introduce these makers to my readers so you to can share in their stories and enjoy their craft. Please enjoy the Maker Series.
This post is by Steve Voigt, Planemaker. Steve has devoted himself to making 18th century wooden double iron planes. As the first contemporary commercial maker of 18th century double iron planes, Steve has had many hurtles to leap in pursuit of his endeavor.
Steve Voigt: I’m thrilled to have the honor of contributing a guest post to Brian Holcombe’s blog. I’ve known Brian for a couple years now and have admired his work a great deal. Moreover, we share a number of interests: hand tools, Modernist and Japanese furniture and design, and perhaps most relevant, an enthusiasm for double-iron wooden planes.
I’m one of a handful of contemporary makers who build traditional British/American-style bench planes. However, to the best of my knowledge, I am the only one making the double-iron variant; other makers have focused on single-iron planes. In the remainder of this post, I’ll discuss how I fell down the rabbit hole of planemaking and talk about some of my influences and working methods.
I made my first planes about 18 years ago, after reading the October 1997 issue of Fine Woodworking, which featured articles on planemaking by James Krenov and David Welter. My early efforts, like Krenov’s planes, used laminated construction, short Hock irons, and no handles. The planes worked well enough, and I immediately fell in love with the feel of a wooden sole, but I eventually became dissatisfied with their limitations.
I was also becoming more and more interested in investigating traditional (Western) hand tools and working methods, an interest that seemed to lead naturally to traditional British/American planes as they were made in the 18th century. If you want to work primarily with hand tools, it seems only logical to look at, and emulate, what people did when there were no power tools, and everything had to be made by hand.
Perhaps a little bit of explanation about traditional British/American planes would be helpful here. The first thing is that they are not laminated, but mortised out of a single billet, and the mortise itself is rather complex, requiring a great deal of handwork.
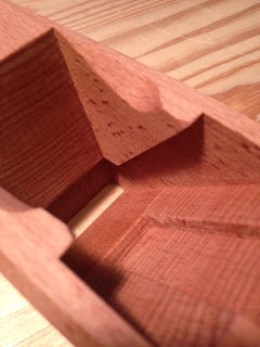
The planes are generally square in section (as tall as they are wide), which gives them stability and mass. They are thus heavier than Japanese planes, but still considerably lighter than metal planes like the venerable Stanley/Bailey. This, combined with the relatively frictionless sole, makes a huge difference when doing heavy, repetitive work. Flattening and thicknessing with a jack like the one below is, for me, a far more pleasurable experience than working with a metal plane.

Ergonomics are a big part of what I love about these traditional planes. The handles (or “totes”) are generally a little shorter than the handles on Stanley/Bailey planes, and they differ in other subtle ways. I find them more comfortable: they were designed to be used hard, all day long, and it shows. Jack planes typically have open totes:

While larger try planes have closed totes.

The so-called coffin smoothing plane (see the photo below) is to my mind an almost ideal example of successful ergonomic design. The coffin shape is stable, and it is widest at the mortise, where extra strength is important, but narrow at the ends, to make holding the plane more comfortable. The design of the heel that I like best, heavily influenced by the work of contemporary planemaker Larry Williams, just feels “right” to me. Some modern plane designs have a heel that is all smooth curves, like a sports car. But when we use tools, it’s very important to have both curves and sharply delineated edges: the edges help us orient our hand as well as prevent it from slipping. And, it just looks cool.

If there is a theme running through this discussion of traditional plane features, it’s that everything is functional. Every design feature has a purpose. The decorative-looking gouge cuts (they’re called the “eyes”) at the top of the mortise make it easier to fish shaving out. The cocobolo diamond in front of the mortise (called the “strike button”) is pretty, but its purpose is to provide a striking surface; hit the strike button and the blade retracts or pops out entirely. I could go on, but you get the point.
Here’s a confession: while I’m crazy for 18th century hand tools and techniques, I’m a little ambivalent about 18th century furniture. I don’t love ornament; I’m a modernist, at home with the Prairie School, Nakashima, and mid-century modernism. But 18th century planes are like modernist design: almost nothing is decorative, and everything has a purpose.
When I was first learning to make these 18th century-style planes, Larry Williams and his business partner Don McConnell were just about the only ones making them. Larry and Don make steeply-pitched single iron planes, and so I initially leaned in that direction as well. But around the same time, the famous Kato/Kawai video, subtitled by Mia Iwasaki, became available, and people on the woodworking forums I frequented began to look at the “double iron” (the term for a slotted blade plus chipbreaker) anew. After a lot of reading and even more experimentation, I became convinced that the double iron was actually preferable to steeply-pitched single irons.Control of tearout was better, the plane was easier to push, thicker shavings were possible, and the surface quality produced by the lower bed angle was nicer. Properly set up, a double iron plane will reward the user with pristine, shimmering surfaces and wide flat shavings that shoot straight out of the plane and then flop over obediently at the end of the cut.

The biggest problem that I faced initially was that there wasn’t much good information on how to make traditional double iron planes, and no one else was making them. All the professional makers were focused on single irons.
One of the biggest advocates in the resurgence of the double iron was a fellow named David Weaver. Regular readers of Brian’s blog may know that Dave made two of Brian’s planes, and he also authored one of the clearest and most useful articles on how to use the double iron. At the time I was trying to teach myself to build double iron planes, David was doing the same. We traded ideas, techniques, and images online; in particular David had access to some nicely made old English planes that served as models. Without this collaboration, I’m sure it would have taken me a lot longer to figure out how to make a really good double iron plane.
All this time, I was building planes just for fun and for my own use. But gradually, a few people started to ask how much I’d charge to build them a plane. At some point, I realized that there was literally no one, at least in the U.S., commercially making traditional double iron planes, and I thought that maybe I should do something about that. Other things in my life were lining up in such a way that starting my own business seemed like a decent idea, so in the summer of 2015 I took the plunge.
So far, the biggest challenge by a long shot has been logistics. The raw materials needed for planemaking are mostly unavailable. Commercially produced beech, the traditional planemaking timber, is nearly impossible to find in the sizes and grain orientation needed for planemaking, so I’ve had to find small, independent sawmills that are willing to cut and dry beech to my specifications.
The irons present another logistical challenge, because traditional plane irons taper in thickness from top to bottom, while all modern irons are of uniform thickness. Thankfully, I was able to convince Lee Valley, the Canadian tool company, to manufacture traditional tapered cutting irons to my specifications. In addition to Lee Valley’s efforts I’ve also been able to find a couple machinists to pick up the overflow and make prototype blades.
A final challenge was procuring chipbreakers. Most modern chipbreakers have a flat bevel and are either milled or simply bent in the middle, while traditional chipbreakers have a sharp bend at the bottom and a graceful curved profile. I looked into having them made for me, but eventually I just decided to make them myself.

One of the biggest sources of inspiration for me, in terms of deciding to do this as a vocation, was a quote from the great chairmaker Peter Galbert. Concerning his own decision to become a chairmaker, he wrote:
For me, chairs and chairmaking are a means to an end. My real goal is to spend my days in a quiet, dustless shop doing handwork on an object that is beautiful, useful, and fun to make.
When I read this, I realized that it applied perfectly to my planemaking. There is very little in a traditional plane that can convincingly be made by machine; there are just too many sharp inside corners, enclosed areas, and surfaces that must meet in crisp arrises. The object demands that I work in a certain way; fortunately, it’s the way I want to work.
When I was first starting to do this professionally, I repurposed my old router-based slot mortiser to rough out plane mortises. It worked, but it made me miserable. So today I use just a few basic (and not too loud!) power tools–table saw, band saw, and drill press–for rough operations, then the rest of the work is done by hand. There are no machine-finished surfaces. It is labor intensive, but like Peter Galbert, my real goal is to be in my quiet, well-lit hand tool shop all day, quietly making these beautiful and useful objects.
As I continue to work, my planes continue to evolve. The basic design is set, but I keep tinkering with the details, both functional and aesthetic. Even something as seemingly minor as the little gouge cuts at the toe of the plane can make a big visual difference, so I keep experimenting.

I want to thank Brian again for the opportunity to talk about my work, and I hope you all enjoyed reading about it as much as I enjoyed writing about it!
Note from Brian: Please visit Steve Voigt’s website Voigt Planes
What a joy to read! it is so nice to read something so well written. Steve has written something that not only gives details but also conveys the feeling of his work and product. His is really a labor of love. Brian, thank you for sharing with us.
Thank you! My pleasure.
I enjoyed this post and I’m glad there is someone out there producing these wonderful tools. I’ve never heard of Steve but have of David, he’s responded to a few of my posts on the Australian woodwork forum and has even done a video for me some time ago to help me out in tapering a moulding plane blank.
Great post Brian
Thank you! As a maker, I find it encouraging as well. David is good people, he’s gone out of his way for me so many times.
Brian and Steve, thank you both. Very thoughtful of you both. Patrick
This was a great read!
Now for the question I have been pondering along with many other plane makers…
“How do I make a plane, without a plane?”
Glad you are enjoying Walt!
Haha….the same way you make a bench without a bench…..5 axis CNC milling machines….no wait…:)
You are right Brian, but I keep pondering how they actually made the first plane?
It was probably just a wide chisel on a wedge of wood tied on with string.
I’ve also been curious to know about that. In Japanese tools the historical progression is from Axe and adze to the addition of the ‘spear plane’ (Yariganna) then later comes the Kanna. I’d certainly be curious to see the evolutionary steps from that spear plane to the kanna…..and of course the same for western planes.
Absolutely, I too have looked to the adze and some sort of long knife to whittle away a nearly flat sole. Heck You could take a round branch and flatten one side with just and axe, then chisel out a mortise to hold that same aforementioned chisel. Create a place for the shaving to eject and tada..
But it would be interesting to see someone with time and money do a history of the hand plane.
Thanks for sharing Brian! I too was unaware of Steve and am thankful you decided to have him post. His passion and attention to detail is very inspiring! I’d be interested to hear more thoughts on his cap iron development and the actual differences in performance of the curved shape vs. the more modern flat bevel. Always love discovering new, small scale tool makers and am encouraged by their resurgence these days. Thanks again for sharing with us
Jonathan
Hi Jonathan,
I think the biggest difference with the cap irons is the way they are bent very close to the edge, so they clamp down very securely on the cutting iron. The chances of shavings slipping under the cap iron are basically nil. But the curved bevel definitely helps with shaving ejection and makes clogging more likely. One of my early planes had a flat-beveled cap iron, the kind you can buy off the shelf. After I curved the bevel, the clogging problems disappeared, and that’s how I got started down the road of cap iron design.
This all sounds great Steve,
I had a long conversation with Ron Hock about the cap Iron and I took one of his and put a sharper bevel on the front and then rounded it slightly and performance was increased substantially.
I do the same with all my restored tools as well.
Keep up the great work.
Brian, great article. I also am starting to make my own planes and the thing that makes a home made tool look just that bit more special is the makers mark. Do you know where Steve got his makers mark stamp?
Howdy Matt,
I’m not sure, but if you reach out to Steve I’m sure he can help.
Cheers
Brian