Hello and welcome to my blog! This post continues a series in which I’m building a wall mounted media cabinet of American black walnut. In this post I will detail the process of building the sliding doors, specifically focusing on the changes that I have made to the design of these doors along with aspects of the work which were covered in brief previously.
I begin the work by resawing material for the door panels, to assist with this work I’ve added a bandsaw to my majority hand tools workshop for wide and long resaws. Resawing it is a term which typically refers to cutting wood to reduce its thickness. Green lumber is sawn into boards at a saw mill, typically the mill will make the boards no smaller than 4/4, (1″~ thickness) and it is very common for wide logs to be sawn to produce 8/4 lumber (2″~ thickness) and so it is the job of the cabinet maker to reduce that wood into a workable thickness for parts other than those which can be made either 3/4″ thickness or 1.75″ thickness.
Cabinet shops of a bygone era may have approached their need for thinner stock in one of two ways; the first option is to order a volume of thin stock to be produced by a sawyer. The other would be to acquire short sections of a log that would be split out and riven into thin stock, usually no longer than a drawer side.
I’ve dealt with much resawing by hand and I’m fairly capable up to 4-5″ wide board. However I’ve had the desire to use much wider material in my work, especially for door fronts. This can be handled by a frame saw, which consists of a long and coarsely toothed saw blade supported by a rectangular frame and operated by either one or two sawyers. The frame saw is quite capable up to 12″~ wide stock and possibly wider. However, what does one do if they would like to resaw larger stock, such as that which would be used as table tops or long cabinet doors? I’ve decided that my answer to this is a bandsaw with 20″ of resawing capacity.

This board, which will be used for door fronts is first sawn into three matching sections. Two of those smaller boards are used for the center sections of the doors, the third is ripped into sections of rift sawn wood along the grain producing the amount of material required to make one panel. To complete the second panel I took rift sections previously sawn from the same board.

The panels were glued up, planed to thickness and finish planed, the completed panel hides the transition from board to board in the rift sawn grain, making up a 19.125″ wide panel that actually appears to be one single board.
I’ve taken notice of the color, this is air dried walnut and the color range is spectacular. It is also surprisingly dark.

Planing imparts a wonderful sheen on the surface, the reflection of my plane can be seen in the surface of the board.

Next the panel is cut to size and rabbeted along the back of it’s long grain edges.
Now that the panel is prepared, I begin dimensioning the battens, rails and stiles for the pair of doors. The parts must first be jointed along their faces and edges, then sawn to thickness and finally finish planed.
I’ve arranged the parts to show a book match across the stiles, having taken too similar sections of the same board and matched them across. The rails are from another board, first book matched across the two doors, then again top and bottom. The battens are on the back and don’t really need to match, though I’ve taken steps to ensure they will look at home with one another.

The parts are now dimensioned, finish planed and ready for work to proceed. The rails are cut with a minor bow to them so that they will clench tightly the center of the panel.

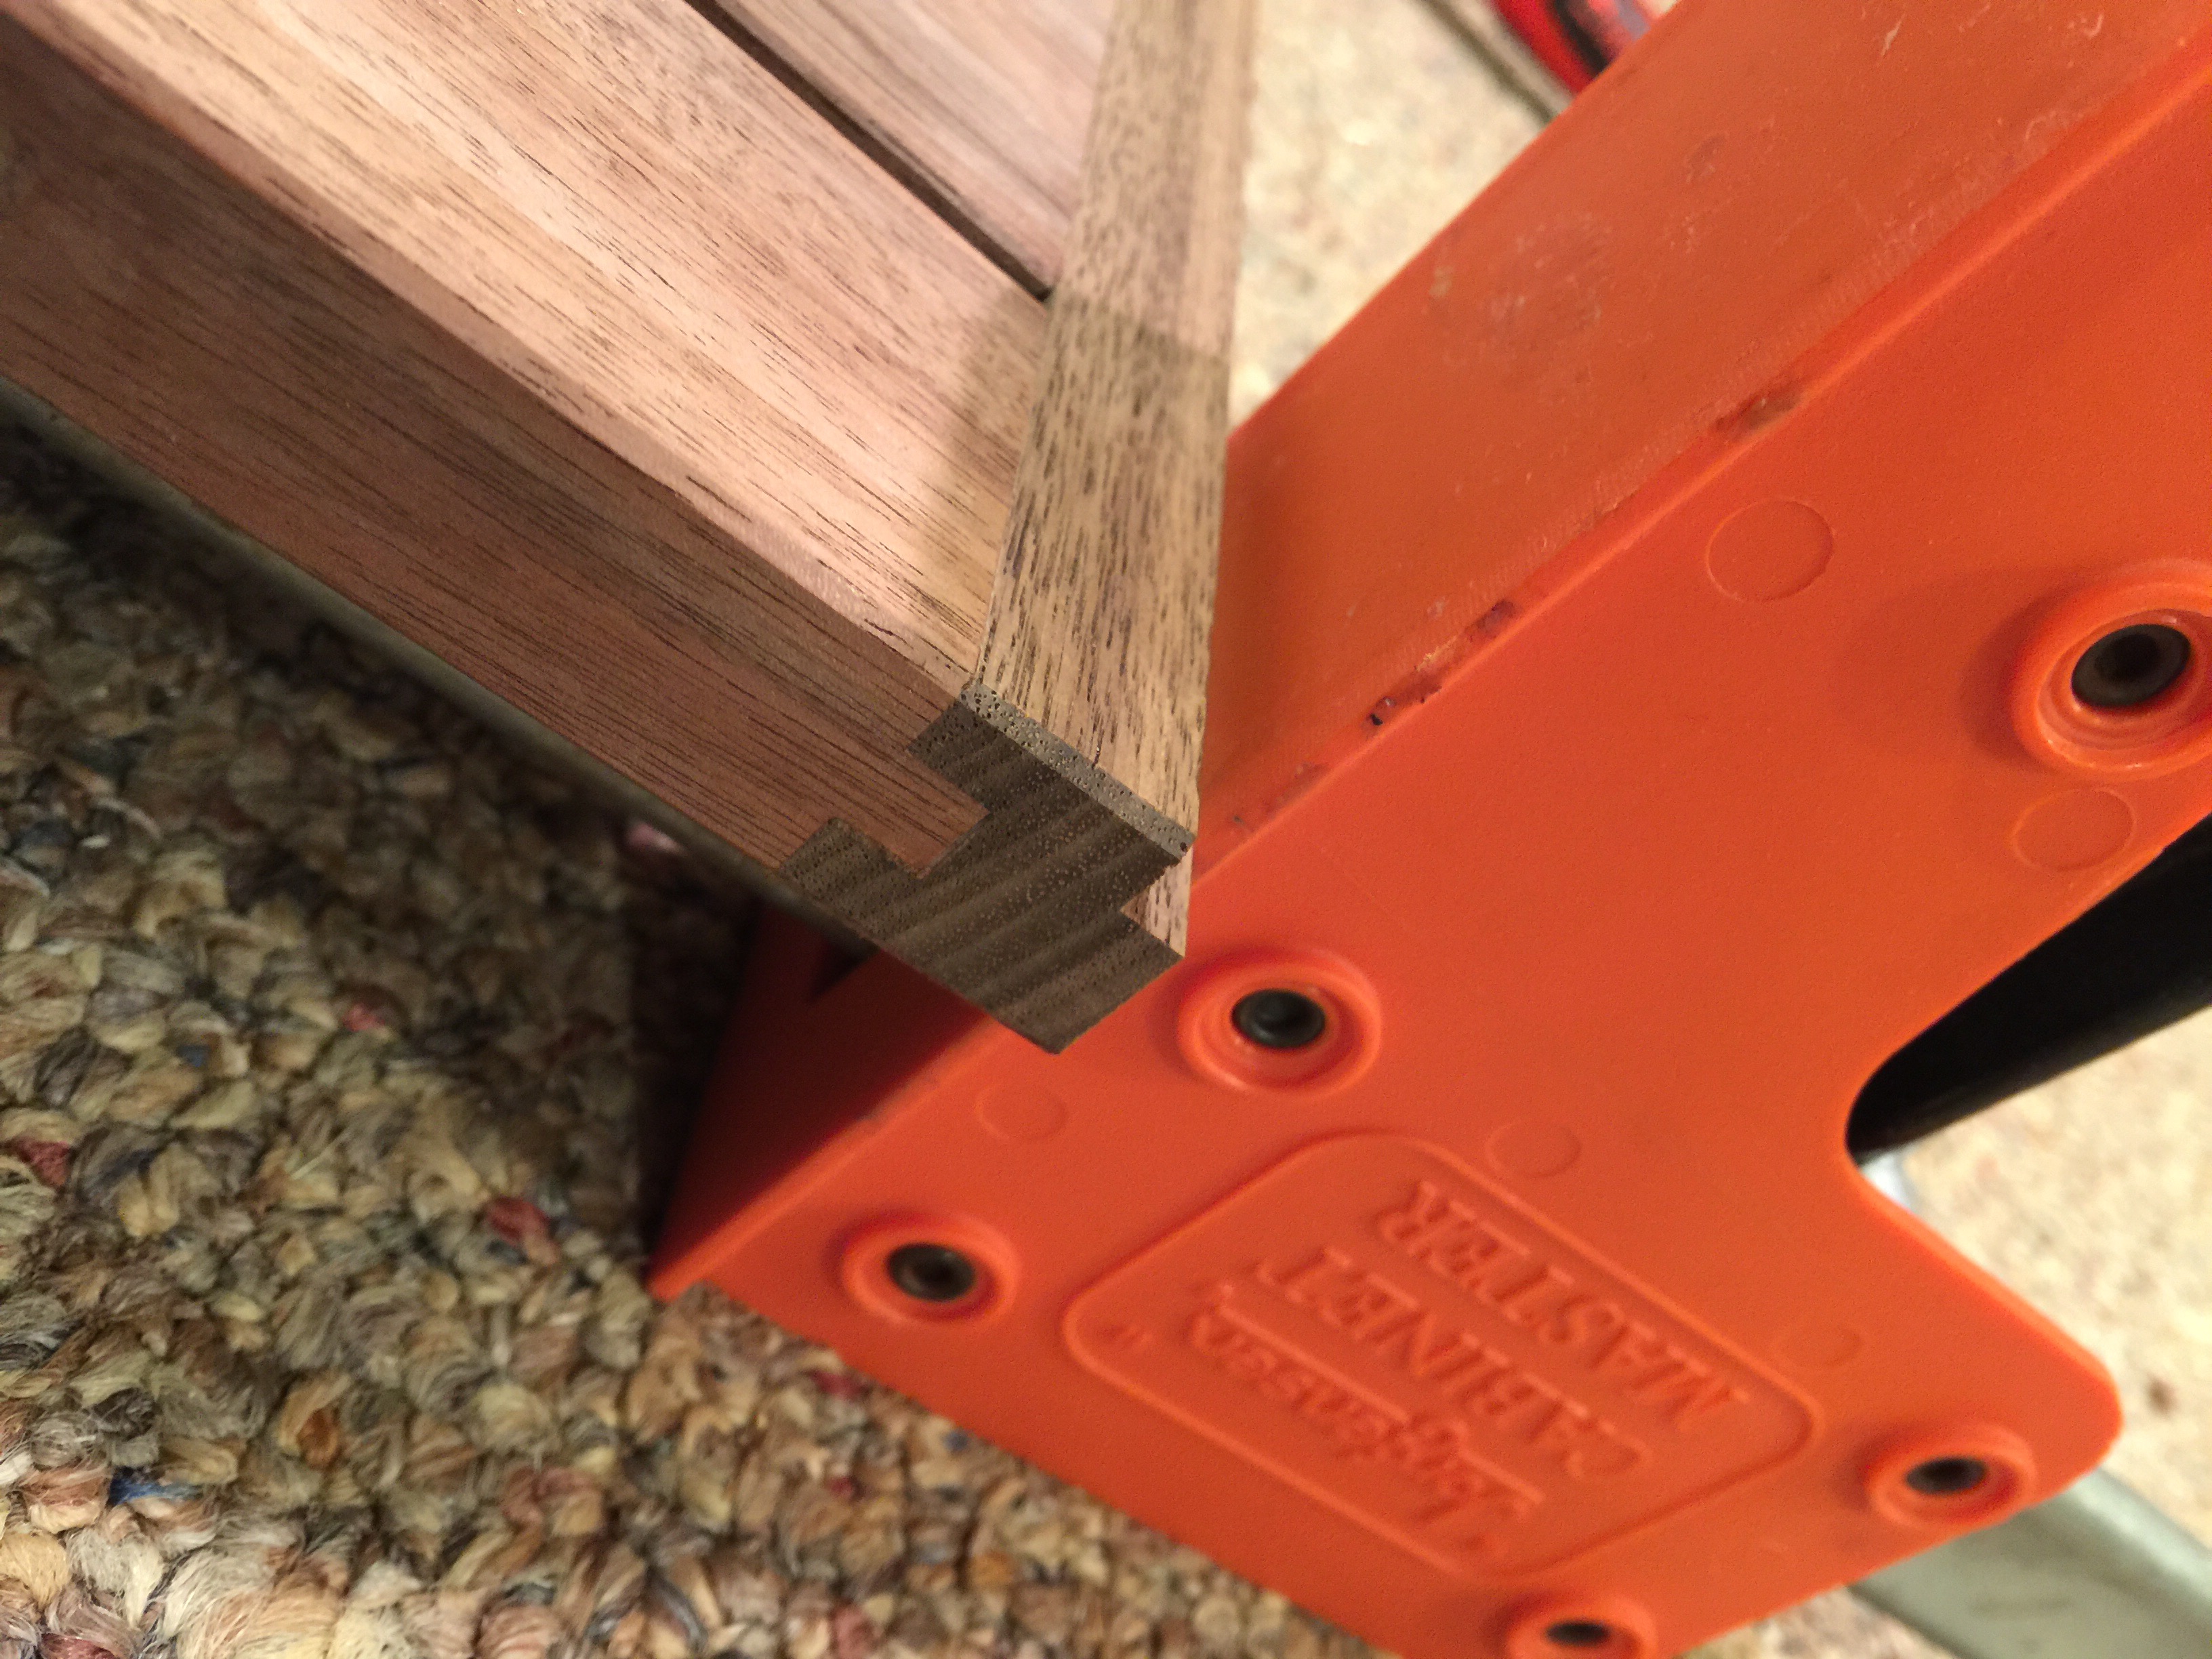
I would like to support the panels as quickly as possible and so I first dovetail the battens and then groove and dovetail the panels to receive those battens.
The first step is roughly plow out the grooves, followed by ensuring that they’re to an exact depth with the router plane. I am aiming at approximately 10 thousands clearance between the floor and the bottom of the batten.

Next I cut the channel to form a dovetail shape. My aim is a maximum of 1/64″ taper over 19.5″ which is a very light taper.

The batten fits into place, as it nears the opposing side I’m taking light cuts to transfer the taper into the batten.

The ends are left standing, they’re now marked out and will be cut into tenons.

First I set my shoulder, the shoulder is used to create an air gap between the panel and the stiles to ensure that the panel will be able to swell in the summer without hinderance.

Next I rip cut the tenons along their width.

Followed by cutting them along their thickness.

Next I crosscut to form the shoulders.

I then check my shoulders with a straight board to ensure that the stiles will fit up tightly to them.

Next I transfer marks to the stiles and begin cutting them out. These are through mortises and so I’ve begun the work by drilling a hole through the stile. I’ll cut in from both sides and allow the mortise to meet in the center.


With the stiles now complete, I turn my focus to the rails. The first step is to groove the rails to fit along the panel. Followed by rabbeting them to fit into the door grooves in the case. Finally I will fine tune the fit with a shoulder plane so that they slide nicely.

I’ve cut a rabbet on the panel and short tenons on the stiles which will join up to the rails. The front is easily cut with a dado plane and batten, I use a dado plane because it has a sturdy nicker and can be trusted to cut without tearout.

Next I mark out and crosscut the opposing side of the tenon.

Followed by splitting away the waste. This is much more effective than sawing for such a short tenon.


Now that the panel is complete, it is ready to be test fitted into the case.

It’s starting to shape up, so the next step is to cut flush the through tenons, plane the sides clean and chamfer the outside corners.

Followed by gluing the rails to the stiles (not the panel) and flush cutting the extending horns. I’ve detailed this process to provide insight on clean cutting such a part.

The first step I take is to saw the horn slightly proud of the stile.

Now if one were to move right to planing flush, the wood at the top of the groove would likely break out creating an ugly mess, to counter this I pare from the bottom up past that groove.

Followed by flush planing, then chamfering. The resulting ends are cleanly cut.

The doors can be returned to their respective grooves, and door tabs are next to be made. The door tabs are created from my pile of gaboon ebony shorts. The work begins with coarse and fine rasps.

Followed by chip carving to create a textured appearance.

Finally the outside edges are chamfered.

A pair of longer tabs is also needed, for them I need to start with longer stock.

After sawing, I plane to thickness. I find it helpful to use a jointer plane along with a spacer to accurately thickness these small parts.

Gaboon and Macassar ebony really like to crack at the ends, so I seal them up with anchor seal. The Macassar was not used on this project, but I wanted to seal them up as well.

The tabs are to be installed on opposing ends of the doors, one high and one low. I begin by marking out and cross cutting waste.

Followed by paring it away to create a flat surface.

Next the tabs are applied and once they’re cured the doors can be reinstalled.

The results of my efforts complete the cabinet facade.

And the view from inside the case.

I was concerned that quickly sliding the doors may damage the tabs. To prevent damage to the tabs, I’ve created stops. The one behind the front door can be made the full height of the frame.

The other stop, which is in the visible track, is tucked away into the underside of the track to remain out of sight.

The result; the doors can be moved without excess caution.


Thank you for following along! I hope that you have enjoyed this post and I look forward to your comments.
Wall Mounted Console: Passthrough
I think the blade you have in there is too wide, I’ve discovered after trying trying many different widths and tpi that a 1/2″ 4 1/2 tpi blade is the best for resawing.
I appreciate the advice Salko! So far, I think it works very well. One of the things that seems to have a big effect is that this saw can tension a blade this wide adequately. It’s an interesting blade to use, being something like 1.5tpi, but I can saw material as thin as 3/8″ without it causing issue. The carbide blades are an interesting and unique animal.
Wow I didn’t know they can go as low as that and I’m referring to tpi. It’s still a good idea to get the one I advised as it cover 99% of your needs including veneers. Just a thought.
Thanks Salko! I’m going to gear up the saw specifically for resaw work, so I’ll probably get infeed and outfeed tables and I’ve been considering a power feeder, but will probably just use feather blocks.
Always depends on the length of your timber whether you need both tables, I for one never did but my build was always 1m and mostly less. I wouldn’t go to any great expense of a power feeder your hands will do a great job. Trust me in the end you may regret the extra expense and get sucked in to all the marketing jargon. None of what they say is necessary.
Good points Salko! Always good to have a voice of reason in midst of much encouragement adding more gadgetry. I’ll likely start with an outfeed table and feather block. So far I’ve reason 12″ x 26″ with good success, so I’m building up the courage to cut larger/longer material.
This is gorgeous, Brian. I am feeling plywood and power-tool cabinet inadequacy right now…
😉
Thanks Brandon! Hah, I bet many are surprised that I actually bought a power tool in addition to my track saw and router table. I added a dust collector to it as well, it has been an adventure…
Beautiful! How do the doors install without taking apart the case?
Thanks Joel! The tracks are cut so that the top groove is deeper than the bottom groove. That decorative appearing reveal around the door frame allows enough gap that the doors can be pushed up and into the top groove then swung over into the bottom groove. The bottom rabbet is made deeper than necessary to mimic the gap left at the top.
Thanks, Brian!
Pingback: Wall Mounted Media Console | Brian Holcombe Woodworker