
Hello and welcome to my blog! In this post I detail the process of making a bar for a kitchen remodel. The bar top will be made of black walnut and the bar paneling will be made of quarter sawn white oak. This post will also detail the process of making cabinet doors and that of the last remaining drawer to be built. This last drawer is designed to hold baking sheets and cutting boards.
The bar top started life in its rough form as a walnut slab about 20″ wide. My client was quite apprehensive when looking at this slab, but I assured them that it would prove beautiful once the surface was prepped and finished.

This slab was considerably thicker than what we wanted for a finished piece, and that worked in my favor. Working with slabs, just as any other board, starts with making them flat on a reference face. I checked the board and determined that It needed quite a bit of work to be made flat, with about 1/2″ cupping and a good bow along the length.
With so much material to remove I worked in stages, first truing the board initially, then letting it set for a few weeks as the remainder of the other work continued. I then returned to the process of working the slab and took it down to a finished thickness. In these early stages it’s good practice to remove a similar amount of material from each face.
Given the massive job at hand I decided to employ the use of a power planer to remove a bulk of the material. I used it very similarly to how I would use a normal hand plane, checking flatness and ensuring that I am removing the twist present as I proceed. I had debated various power planers but landed on this one due to how quiet it is.

Removing material from the convex face of the slab will cause it to relax, aiding if the removal of the cupping. This works as a benefit to me, so I begin most work on the convex face, especially with large pieces like this one.
Next I was able to bring the slab to thickness.

I finished the work with hand planes bringing about a fine surface free of tearout on he top face, then moved to the edges next tuning and finishing them with hand planes.
Happily the board is beginning to show wonderful character and a nice dark tone to the heartwood.


The finished edges are quite sharp and so I chamfer all surfaces to allow the piece to be touched without hesitation.

I brought the slab to the site, then mocked it up in place on the bar top. This allowed me to visualize the cut I had planned to make. I then removed the slab and marked out the material to be removed. Being on site I worked with track saw and router to remove the material around the remaining wall section. Finally I applied an oil finish the bar top in preparing it for life as a bar.

My client was amazed that this was the same board as shown in the original photos, I have to admit I am as well.

Next, my client (a talented metalworker) and I prepared a support system for under the bar top which will allow it to move with seasonal humidity changes and yet to remain very sturdy in use. There are a number of attachment points along the top of the support in addition to the two legs shown running down the sides. The support will be mainly hidden from view in use.
This metal support was also utilized to sure up the half-wall that remained after the studs were cut down. Not shown in the photo, but they’re there are metal supports that lag the outside stud into the floor plate. I did not want the wall to rely upon the cabinetry, as it is poor practice in my opinion, and so I requested that the wall be made strong in and of itself.

The client will be completing the drywall work around the remaining wall support.

A look at the finished bar top.

And chamfered corners.

Returning to the shop, my next step was to build paneling for around the bar. These panels are made exactly as the drawer fronts were made. They are made of baltic birch ply edged in quarter sawn white oak and veneered with shop sawn veneers.

The panels will attach to the bar with a system that utilizes a french cleat at the waist, and a rabbet at the base. The french cleat is made from douglas fir. Here I’ve created lapping joints where the uprights will join into the cleat. The cleat will be entirely hidden from view.

The remainder of the bar frame is made in quarter sawn white oak. The bar frame consists of of a surround which will fall behind the paneling and a cover for the column at the edge of the bar.

Much of the remainder of the kitchen is in the process of changing and being renovated, that work is being performed by the client in stages. They’re removing the upper cabinets and tiled backsplash, then repairing the drywall and painting. They’re also installing a new hood and ducting while removing the cabinets above the stove.
When designing this kitchen we had discussed the possibility of having no upper cabinets. This may seem quite odd to those so used to having them, but now that they’re gone and everything can be stored at a comfortably accessibly height, it seems they’re not missed. I have a set of shelves in the plans for the area nearest to the stove.
Other areas of the kitchen can be used to store so much that was previous in the upper cabinets. Lifting a heavy set of plates, for instance, is much more comfortable in my opinion from waist height than it is from over the shoulders on down. The same with glasses and bowls. No more uncomfortable reaching into the back of the top shelf to get the heavy ceramic bowl you don’t often use. The redesigned lower cabinets take care of all of these needs. The last remaining area, that around the refrigerator will also be used for storage of heavy and bulky items, it will be the place where mixers and uncommonly used machinery will be stored.
Returning to the work; I trimmed up and fitted the bar frame in place accounting for a large error in the floor. The bar top support is completely out of view in use, but I feel it looks right at home when one peaks under the bar top. Old floors are very often a wave pattern and this one was no different.

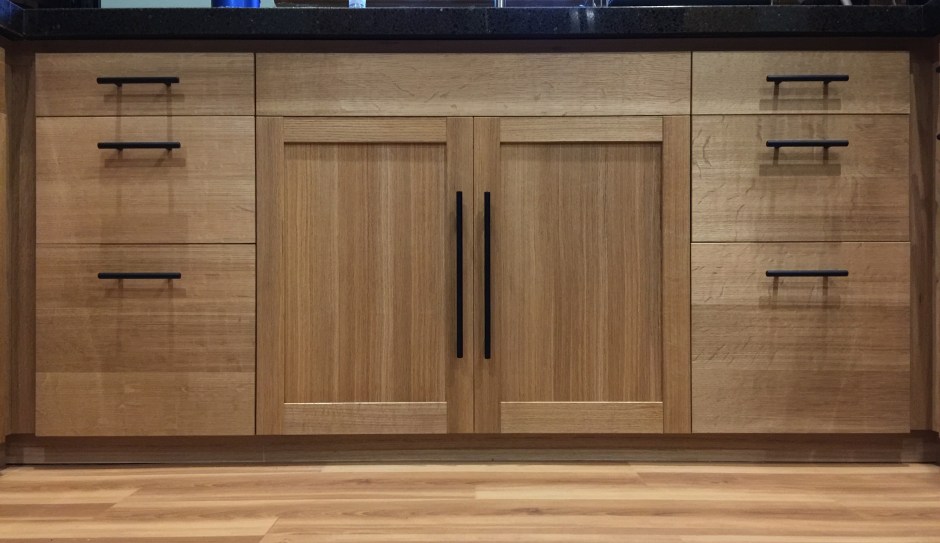
As I completed the bar I was also building doors to complete the cabinetry under the counter and above the dishwasher. The doors are made with haunched mortise and tenon joinery to houses a floating panel. The panel is made of quarter sawn white oak as are the rails and stiles.
The panels are slip matched, then glued and finished. I prefer to slip match quarter sawn material so that I can pair three matches into the same panel. When putting together a slip match I prefer odd numbers to even as I feel it makes more sense for something to be slip matched when there is an odd number. It would be impossible to book match and make it look correct when using an odd number.

With the panels complete, they’re then installed into their respective frames and glued. The glue is a type of liquid hide glue that requires warming to flow nicely. I set the bottle into a tub filled with warm water.
I prefer to construct frame and panel doors utilizing a step between the rails and stiles. The rails are offset from the stiles by the thickness of the chamfer running around the interior of the door. The chamfer in this case is about 1/16″, so my offset is around 3/32″. I feel this gives the doors a depth of character, it also makes them a little nicer to handle with inside and outside chamfers on all edges.


The last step in this phase of the project is to build a special drawer for holding baking sheets and cutting boards. I set this aside to complete after the other drawers because I wanted to be able to focus my attention on it specifically.
After mulling over various approaches to making such a drawer I decided that this drawer should be, in part, like any other. I made the base of the drawer as I would any other traditional drawer with exception that I made the back of the drawer heavier to hold an upright.
I determined that I would use two uprights joined into the drawer by way of bridle joints. The uprights would join into a band around the top of the drawer which will retain the boards and sheets in use. To provide additional integrity and another way to sort the contents of the drawer I joined the two uprights with a center stretcher which utilizes through cut mortise and tenons.

I was quite pressed for time, wanting to complete the project for Thanksgiving, sometimes this is just the push needed to get the creative forces working.

With the drawer face installed:

I have a Bridgeport milling machine at my father’s shop that I tend to use for precision drilling amongst other things (metal work for instance). In this case I thought it best to create a fixture for the hinge cups and another for the drawer pulls and utilize the mill to ensure that these items are drilled accurately. However I did not take photos of the process, only the finished result.
Some adjustments are needed still, some of which can be done with the slide adjusters alone and others will require a minor tuning on the sides of the drawers to ensure all gaps are even. The left side appears right on, but the right side needs work.

The same applies to the large doors and drawers under the bar area counter.

A little use and then the tuning will follow. I prefer to use them slightly before tuning as sometimes I find that with use they adjust themselves slightly and find a home, so to speak. Once that happens I can tune them up once again.

I returned to the site to tune up the drawers and doors this week but did not retake the photos. I will do so once the work on the remaining drywall is completed.
The next step in the process is to make a set of shelves for the area above the counter and the final stage of this build will be making a surround for the refrigerator. That part of the project is currently in the planning stages as we wanted to put it off until after the holidays.
Thank you for following along and I look forward to your comments and questions.
Outstanding!
Thanks David!
Curious…once you have planned out the cupping, is the slab then stable? No more movement as the weather changes?
Hi Steve, Good question. The slab will certainly move with the seasons so a system of battens was made to help keep it flat. Walnut is relatively stable but I like minimizing the chances of it twisting or cupping again.
Excellent write up and photographs. Appreciate your willingness to share with the rest of us. Gives me some ideas for my own house.
Thanks Barry, appreciate your comment! Glad to inspire.
Nice job Brian, Always a pleasure to see your work.
Thanks Mark! Very good to hear from you, hope you are doing well.
Wow the kitchen turned out really nice, well done Brian. You’re very lucky to have a supply of such wide boards
Thanks Salko! They’re rare indeed, it took some doing to hunt that one down. Certainly depends on the material, it can be easily to find in some exotics but quite difficult in the local stuff since it has been sawn for so many years now.
If they set up more tree farms we would have a generous supply. I think it’s more to do with profits, they can get more out of narrower boards than one single wide piece. In this country they now charge what it would costs to glue up two or three boards. There’s no saving so you might as well just hunt for the width you need. Whether you will find it that’s another thing.
We are lucky in that some of our hardwood forests are very well maintained, but it’s very unfortunate that our softwood supply was not maintained at all in the 19th century. I like to avoid glue ups so I hunt for the full width if I can get it.
Hi, I’ve been commissioned for a similar project. How did you finish the bar top, and did you widen the holes in the battens to allow for movement? Thanks. Eddy
Thanks Eddy, I used oil finish and yes the holes are elongated for wood movement. Good luck with your project.
Beautiful work Brian, the finished kitchen looks great!
Thanks Jon!