
Hello, and welcome to my blog! In this post I will detail the completion of a recent kitchen project. The final part of this project details a built-in storage surrounding the refrigerator and a set of shelves to complete the area above the counter. The homeowner has completed the the demolition and finished renovating all aspects of the kitchen outside of the cabinetry.
This project has been planned to be completed in stages of work. At the end of each stage the kitchen would be made presentable and usable to accommodate family parties and holidays parties. For this reason the work has been stretched over a longer period of time than would typically be provided for a kitchen build and installation.
The shelving above the counter was the first section of this work completed. The shelves are wall-mounted with an additional upright tie bar. We were unsure if these would need to carry weight so I built them to be quite substantial.
I decided to work from some heavy white oak slabs that we had ear-marked for another stage of the build but decided against using previously. These shelves present a grain pattern which I consider quite unique. They are sawn with the grain running in near perfect alignment to the face. This type of sawing presents as a marbled pattern on the face, rather than the cathedral of grain normally presented on flat sawn boards.

Once the prep work was complete, next step is to plane the shelves to a fine finish and detail the edges with a chamfer. Some edges are chamfered before the joinery and some after.

Next the back of the shelves were grooved for the reception of poplar wall cleats.

The wall cleats are then mounted in place and the shelves marked out for joinery. The joinery is a simple halving joint. The joint fits into the face of the shelf and to account for the distance removed by the joinery I cut to measured marks. The result is a joint that locks into position and must be installed at an angle.

To finish the tie bar I applied a deep chamfer to the ends of the bar, along with chamfers on the outside surfaces, the same treatment of chamfers was applied to the outer edges of the shelf. I mocked up the assembly in the shop.

Now installed, along with major progress having been made in the other aspects of the project. The stainless hood, for instance, really helps the kitchen come to life.


This kitchen design moves away from those utilizing upper cabinets. My clients wanted a storage solution that would allow them to work at waist height wherever possible and they found it preferable to pick heavy objects from lower heights.
The earlier stages of this project aimed to make practical storage for the area below the counter top, utilizing drawers rather than open spaces and allowing them plenty of storage for heavy plates, cups, cutting boards and utensils all at easily accessible heights.
In the final stage of the project I needed to make space for heavy equipment such as food processors. These heavy pieces are sometimes quite uncomfortable to lift from very low levels so I designed a solution around that problem. I proposed a storage unit which would surround the refrigerator, building it in, and allow practical access to heavy pieces.
This project started with a 3d rendering.

I planned this aspect of the build to allow storage on the left of the refrigerator in the form of very deep drawers, and storage above the refrigerator which would be simple open cabinet space behind doors. The cabinet would be built in two sections and with two supports. The supporting sections to be made of poplar and faced in white oak.
I firmly believe in making a heavy plinth for cabinetry, the plinth allows me to have a near perfectly level foundation offering support and a sturdy mounting location. That said, I managed to take exactly zero photos of said plinth, so it will have to exist as internet legend alone.
I began building the large cases in birch ply. The upright case would be made from two sections joined top and bottom utilizing mortise and tenon joinery.

The tenons at the junction between the upper and lower sections of the upright cabinet were cut to make a half lap joint. The joint sandwiches a mortised panel which functions as a support at the middle.

To make the cabinet rigid I utilized heavy supporting uprights and capped them in quarter sawn white oak. The edges along the middle and bottom panels were also capped in QSWO (quarter sawn white oak) while the top panel would sit behind the molding of the upper cabinet.
Seen here are the QSWO faces after hand planing and chamfering detail.

The overhead cabinet, which joins into this upright cabinet, would be made very similarly to the upright. A large top and bottom panel were mortised to receive tenoned uprights. This structure was also made rigid with hardwood supports and capped in QSWO.
The support was made utilizing bridle joints with supporting crossmembers applied using halving joints. The crossmembers would be utilized to secure the face panels making up the cabinet facade. The back half of the cabinet would be supported by a wall-mounted batten.
1/4″ plywood spacers were needed between the sections of cabinet. These allowed the total amount of plywood to equal that of the molding to minimize the overhang inside the upright cabinet.

Next step in the build was drawer-making. I was able to make a few changes to this process to improve the result and speed. The main time-sink in making drawers had been in smoothing veneers. I had been shop sawing the veneers to exact thickness, applying them and smoothing the result.
This time around I decided to put a newly acquired machine to work; a Minimax FS41 Elite S jointer/planer. I started by resawing veneers considerably over-thickness. I then machined them to exact thickness. Now I could lay up the veneers and all of the resulting panels would be exactly the same thickness at the glue-up stage. The finished surface needed only a touch of hand planing to brighten the surface and remove planer scallops.

I planned the veneers for this side of the project to match the full way across the cabinet. Working from one board heavy enough to supply the necessary veneers. These veneers are applied to birch ply panels which are wrapped in QSWO hardwood edging. The edging is made about 1/2″ thick.

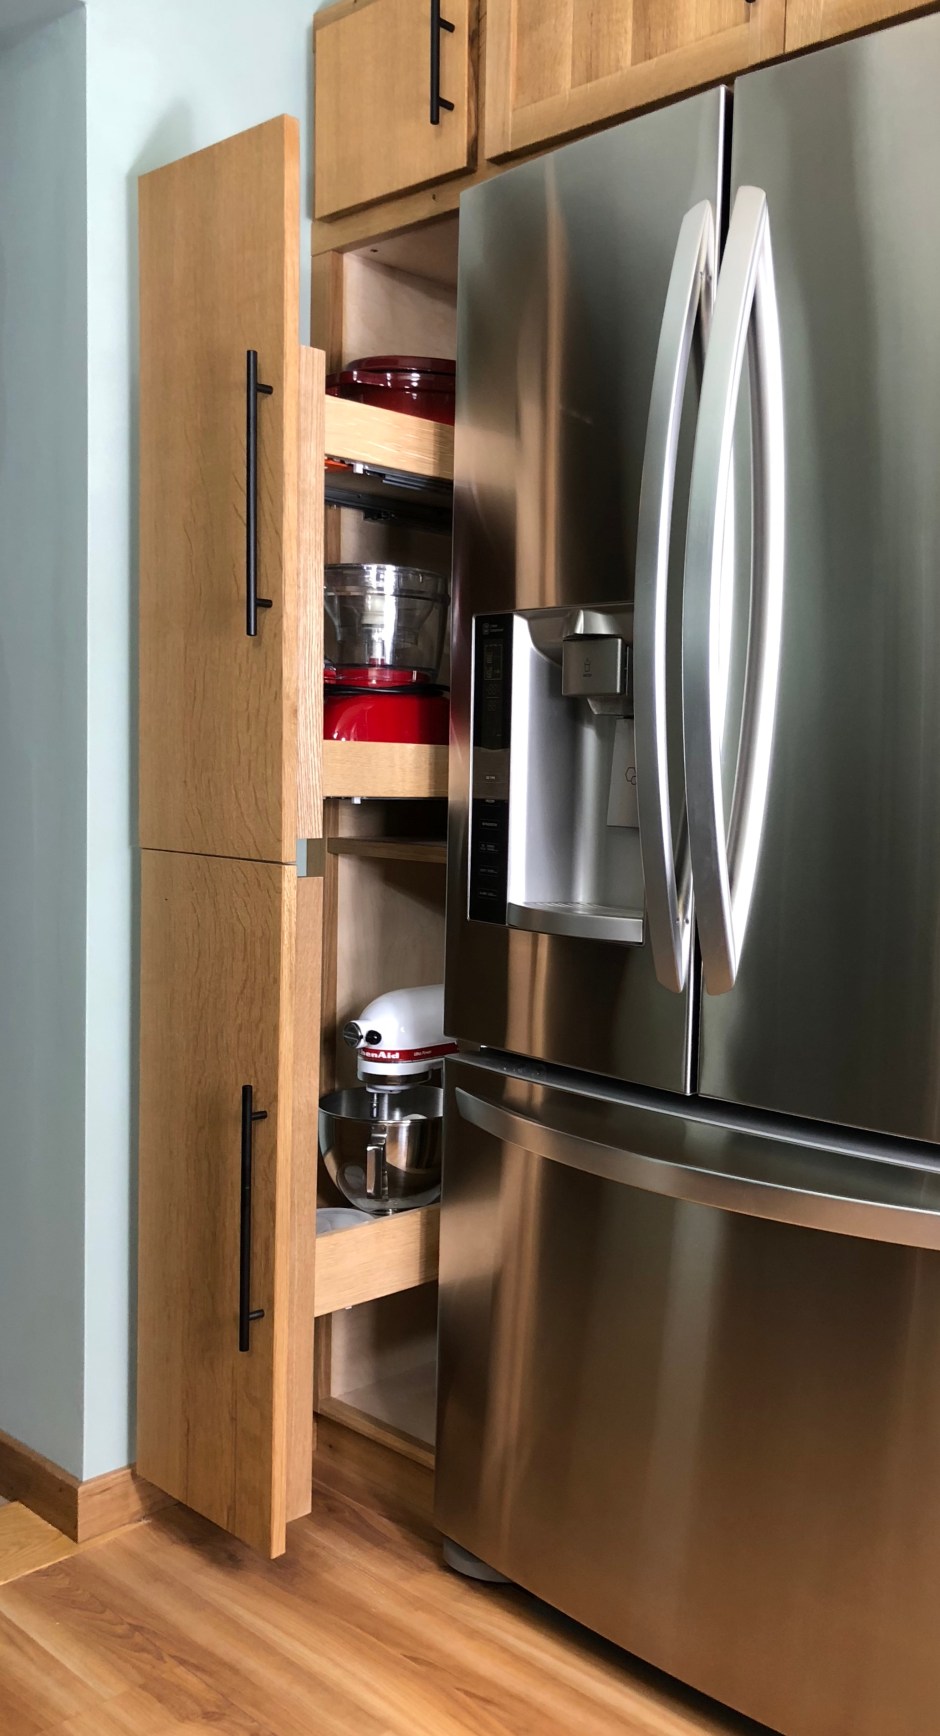
The drawers for this cabinet are uniquely designed to accommodate side access of tall and bulky items. They would also need to carry large drawer fronts and they would need to extend and retract without rubbing the cabinet sides or wobbling.
The top drawer would ride on four slides and utilize two decks. The lower would be offset from the bottom of the cabinet and be made to carry the tallest piece of equipment in the kitchen; the mixer. The bottom drawer would have the drawer structure raised from the cabinet bottom to accommodate the user.
To give the drawer leverage against the tall drawer face I decided to join the drawer sides into uprights, the remainder of the drawer would be dovetailed. Shown here I’ve fitted the back of the drawers with dovetails.

The uprights are coming together here, the first mortise was squared after cutting and the second is soon to be squared.

The drawer parts for both drawers laid out here and assembly has begun.

The drawer, finished, installed and being tested here.

This completes the kitchen build, I hope that you have enjoyed following along with this project. There was much delay in making this post, I decided to wait until I could take finished photography and that delayed my posting a bit more than expected.

Please enjoy a photo walk-through of the completed kitchen build. Thank you for following along with this project and I look forward to beginning again with the projects I have coming up. I also look forward to receiving your feedback.
The stools shown are copyright off BassamFellows and used with the written consent of BassamFellows.


beautiful work Brian. Clean, uniform color, over the top joinery….excellent
Thank you Joe! Very much appreciated!
This kitchen is stunning! Thank you for sharing your work.
Thank you very much!
Very handsome cabinetry -sleek, efficient and very appealing. I envy the homeowner who is fortunate enough to have such wonderful craftsmanship. Truly great job!
Hi Kate, Thank you kindly!
Superb work as always, Brian. Timless in design and well made this kitchen is probably going to have a long life. Hope the owners take pleasure in using it and get inspired and have fun there
Thank you Ty! The reports I’ve received are good and they’re putting it to constant use, which I’m glad to hear.
Pingback: Brian Holcombe and expert cabinetry: Off the Ground – Dr. Ron's Tutorials